Students
Explore the connection between algebra and geometry, deepen understanding of math concepts, and use the geometry calculator to complete assignments and projects.
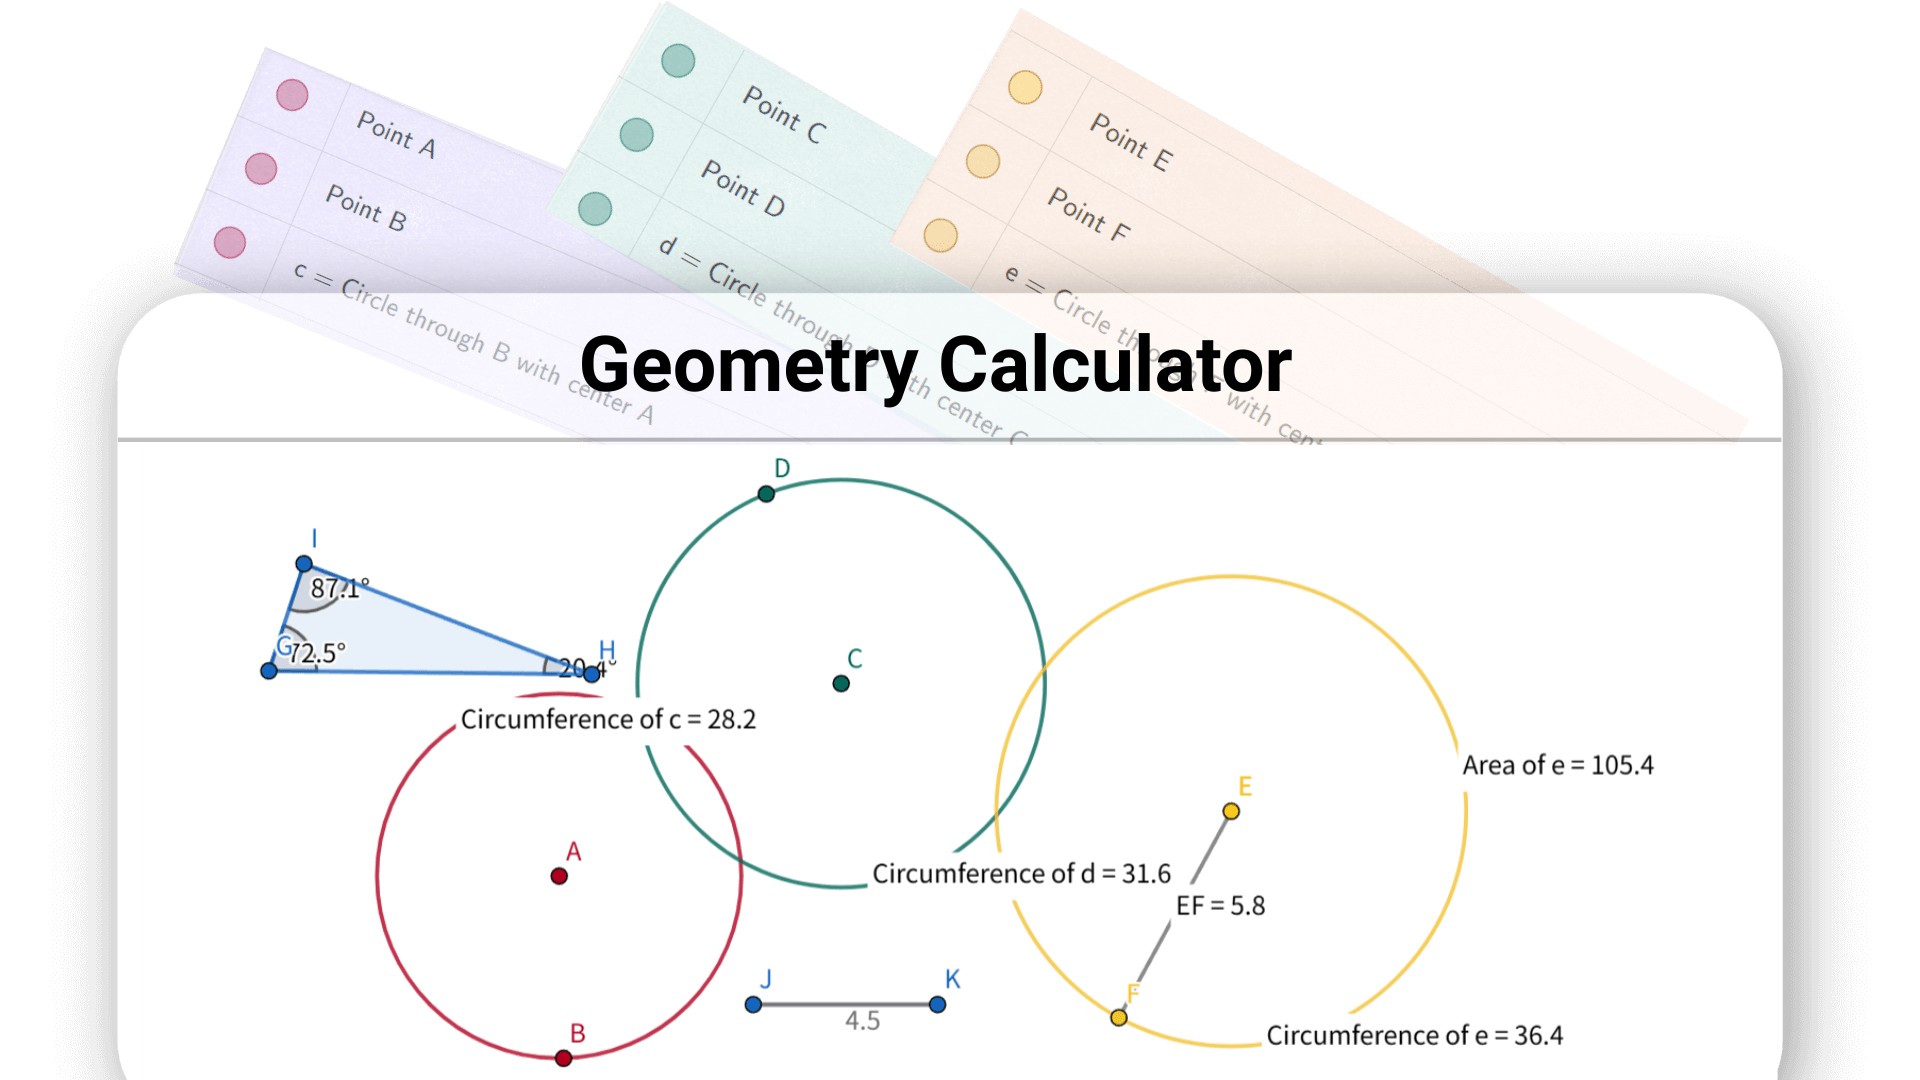
Geometry Calculator can draw geometric figures and calculate their properties, providing an efficient solution for learning and exploring geometry problems.
Geometry calculator is a powerful calculator for geometry that integrates functions from algebra, geometry, and data analysis. It is designed for learning, teaching, and conducting various types of geometric research. Online geometry calculator helps users explore and calculate geometric problems more intuitively and efficiently.
Decopy's best geometry calculator can save you valuable time, no more flipping through textbooks or sketching on paper. It allows you to focus on understanding geometric concepts rather than getting bogged down in complex calculations.
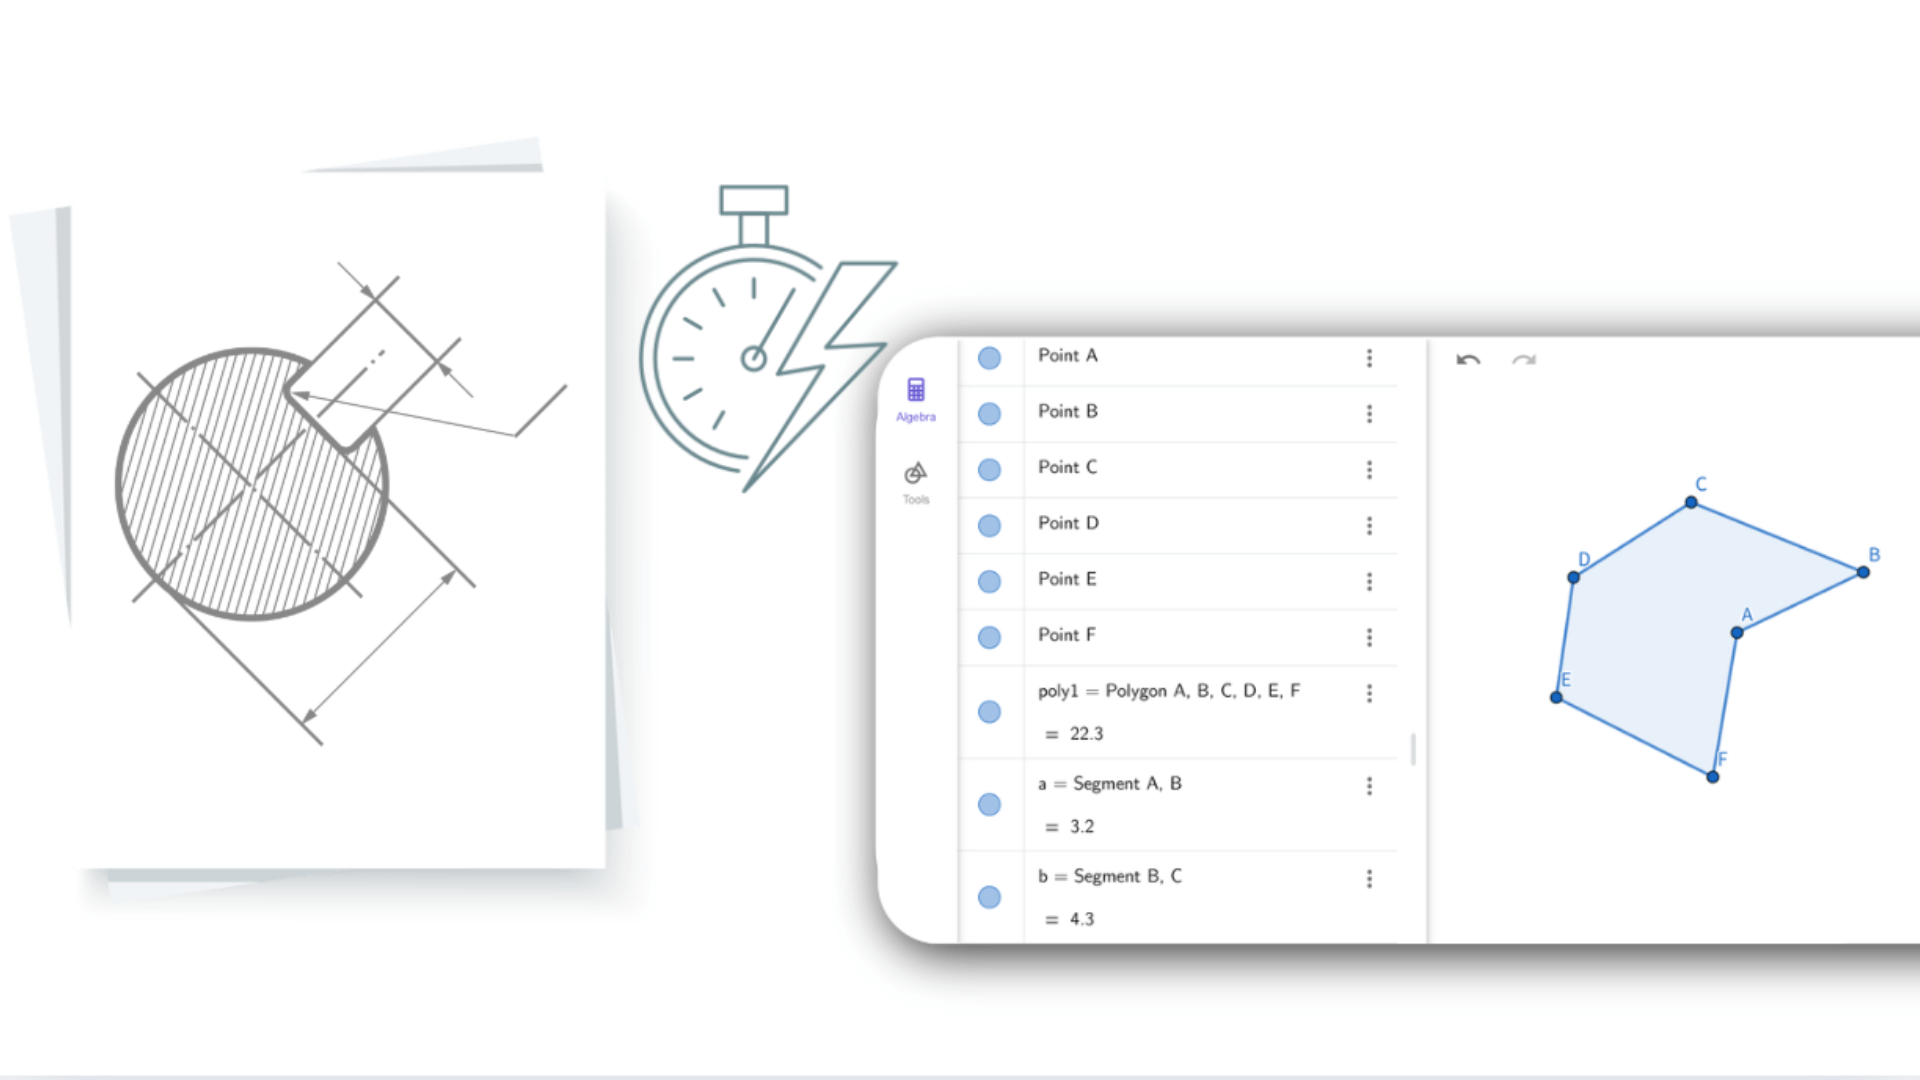
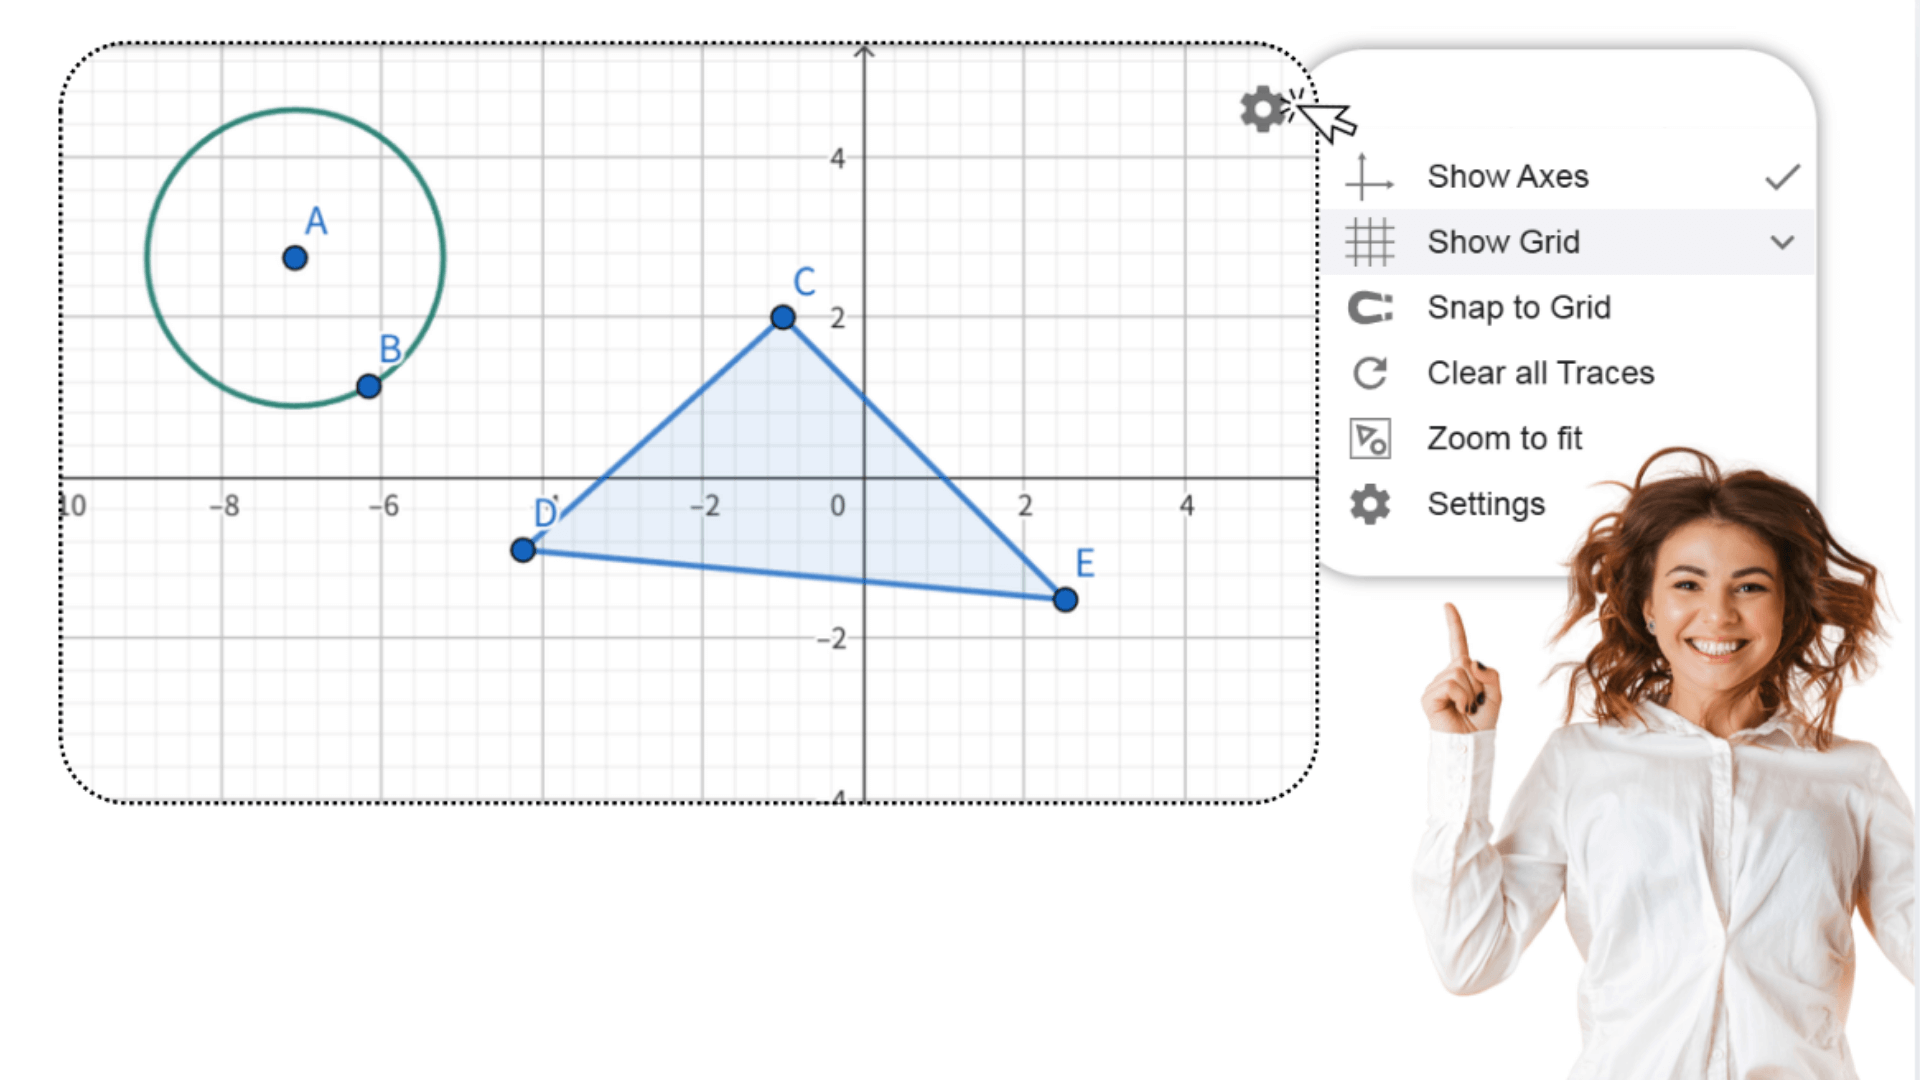
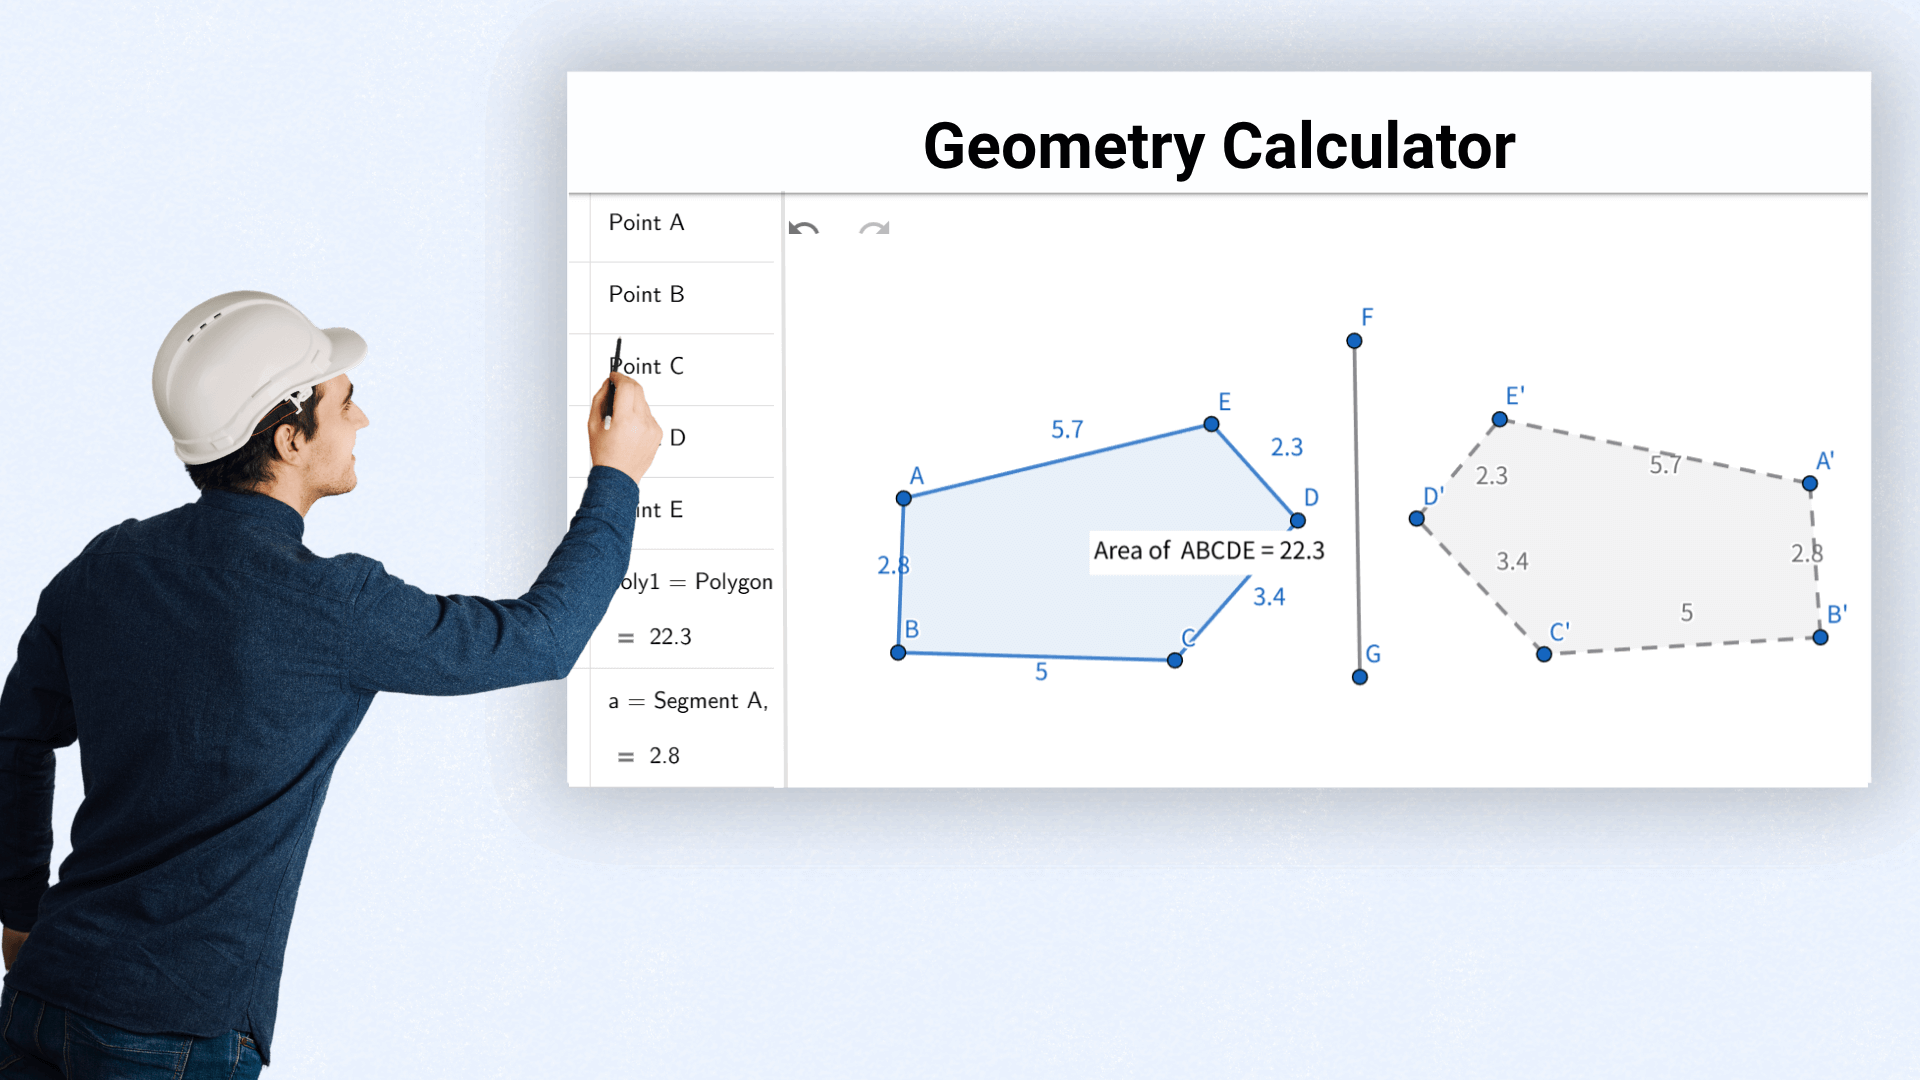
By entering equations or coordinates, the geometry calculator instantly shows the corresponding shapes. Adjusting a figure updates the related algebraic expressions in real time. This dynamic interaction connects algebra with geometry, helping users understand problems from different angles. Geometry calculator abstract math becomes visual and easier to grasp.
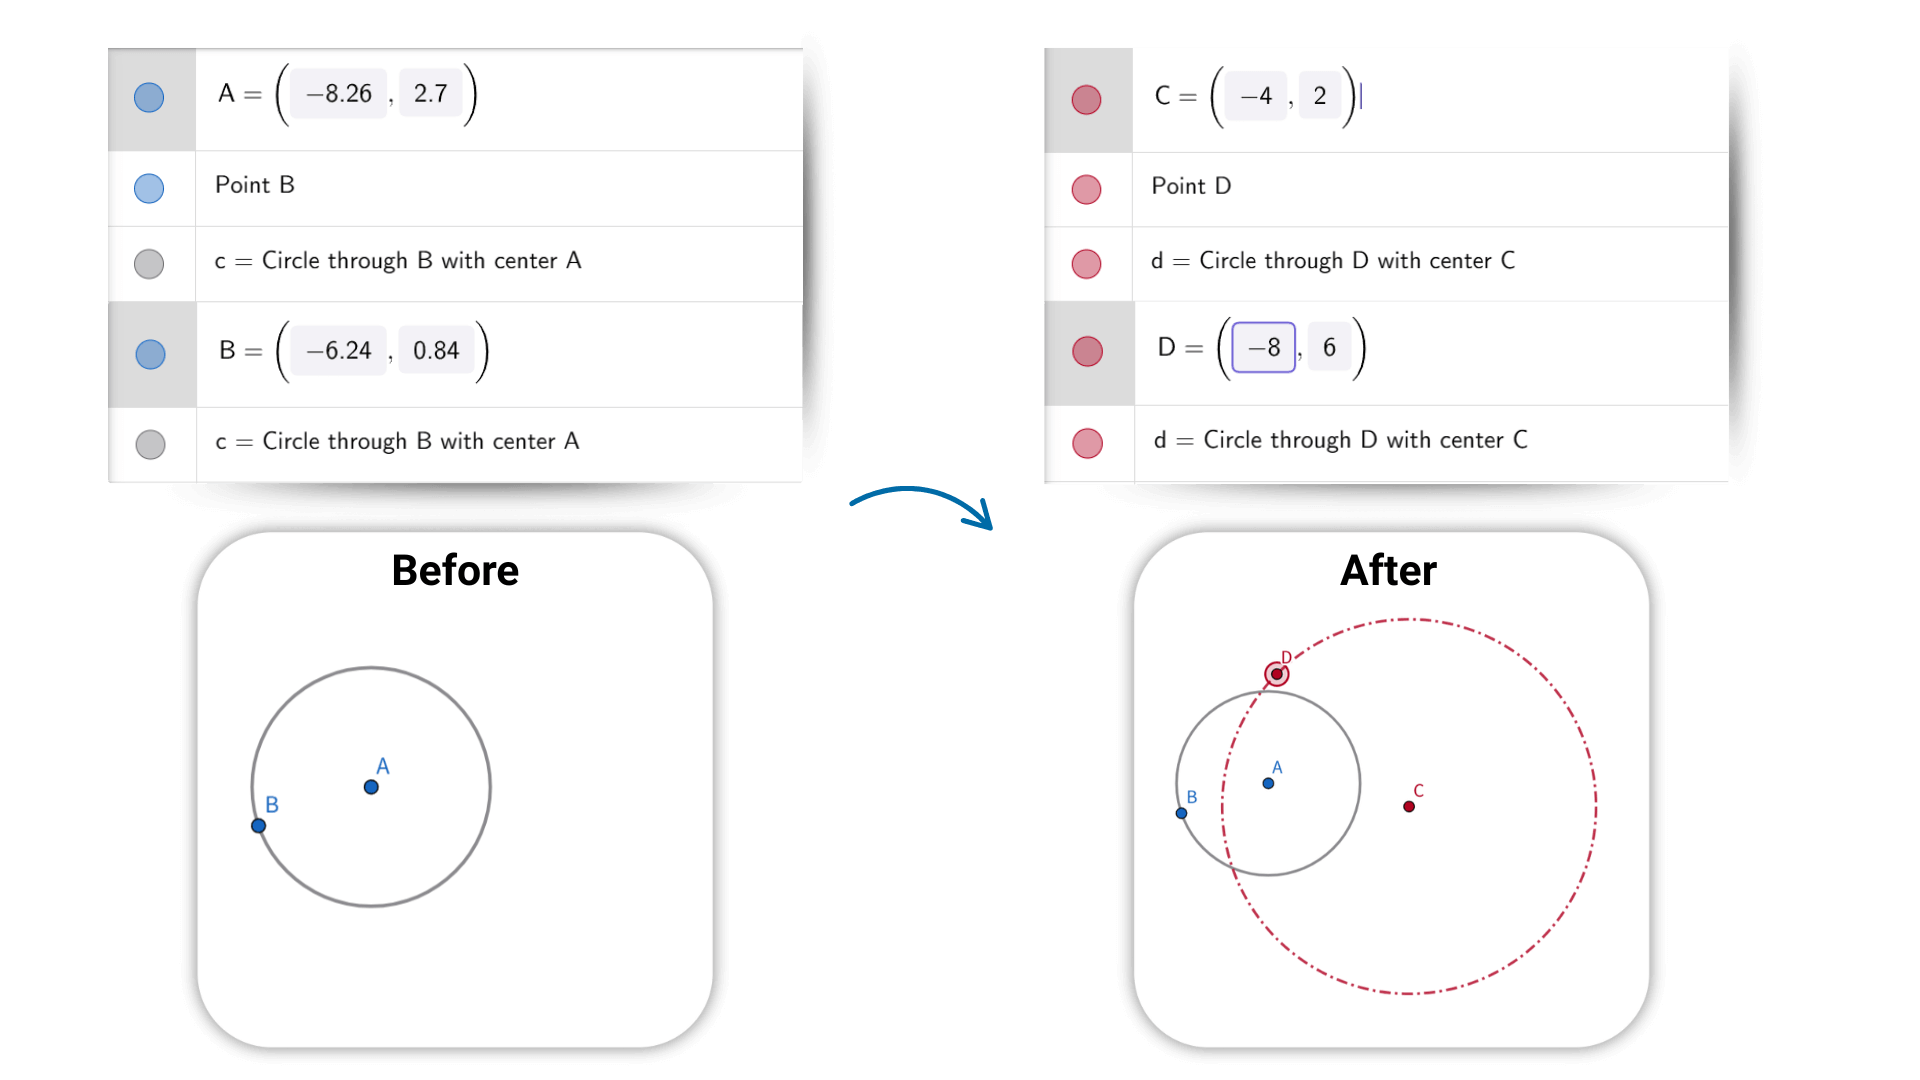
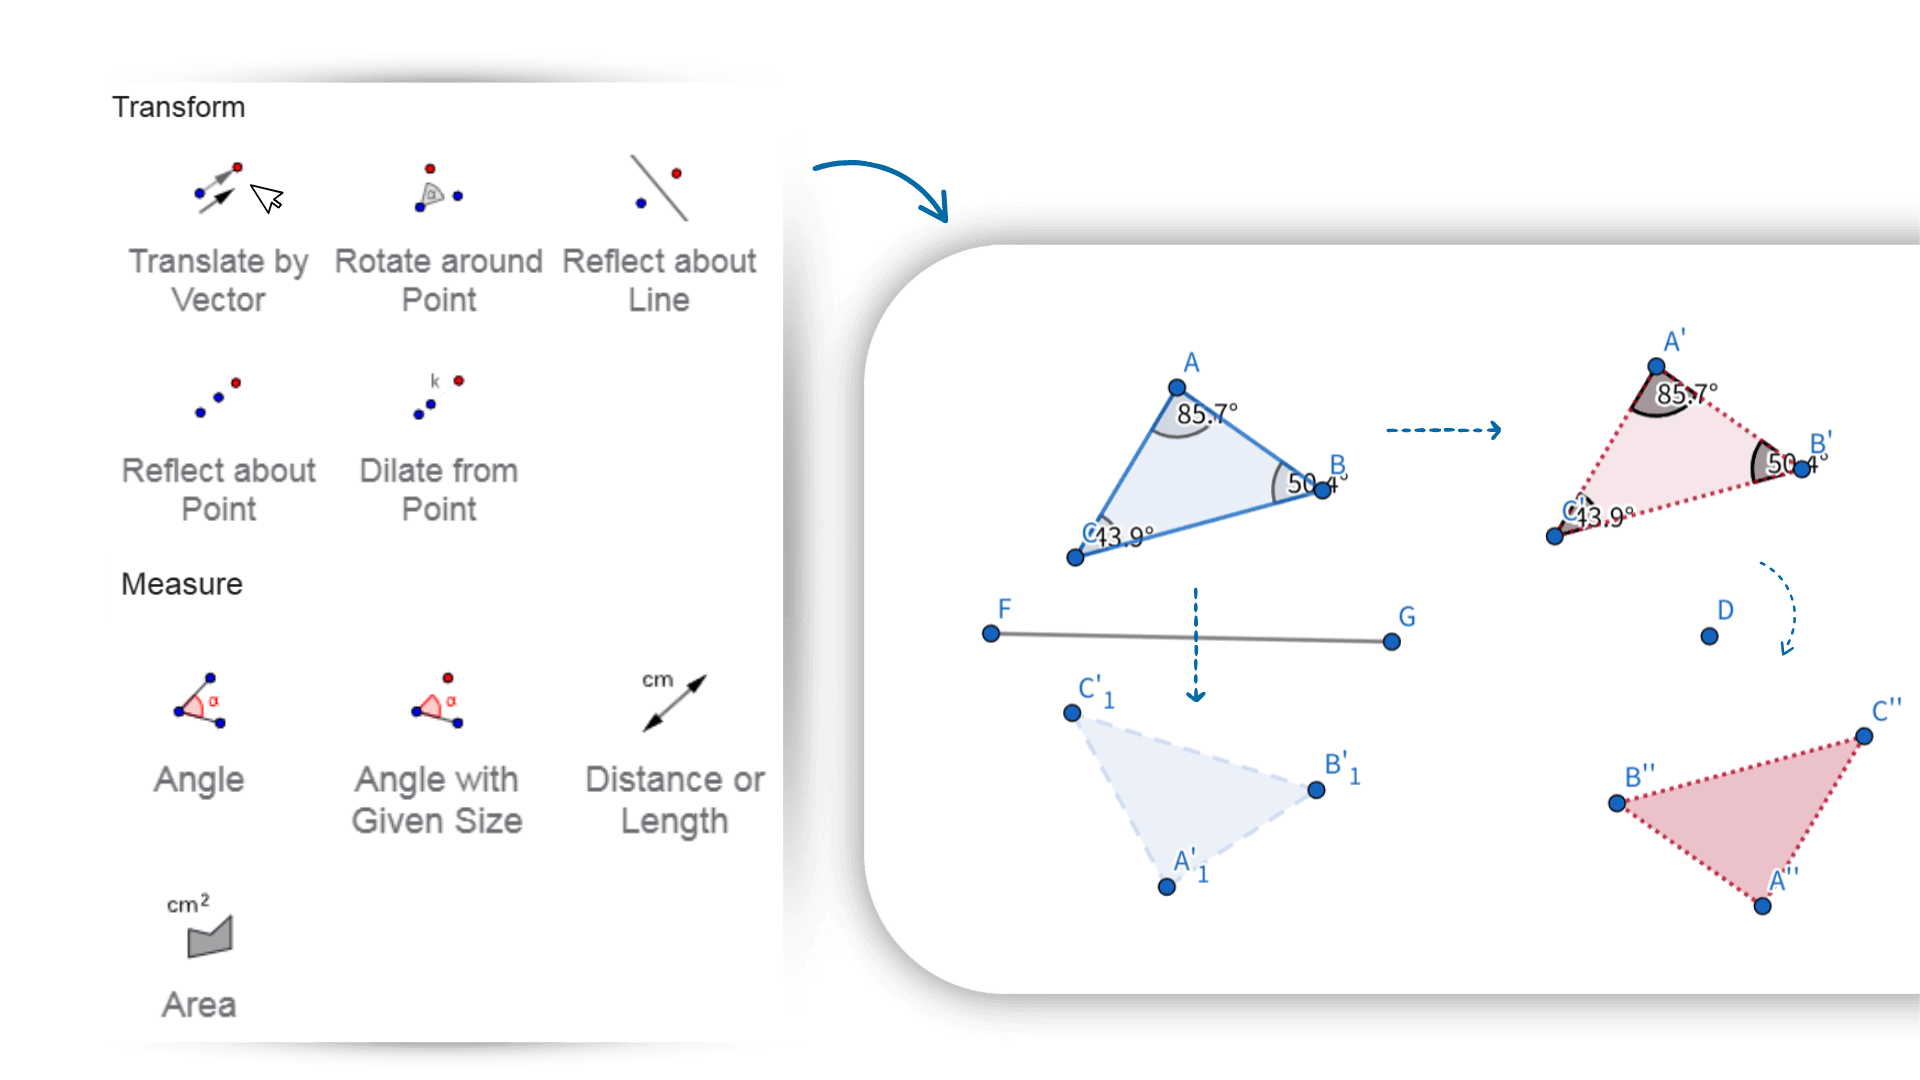
The geometry calculator supports transformations like translation, rotation, and scaling. With simple actions, you can see shape changes in real time. Figures, expressions, and data are fully interactive—dragging a point or adjusting a parameter automatically updates related relationships and results. This Online geometry calculator helps you explore how geometric objects connect and behave, making it easier to understand their dynamic nature.

1. ![]() Select the Line tool and create an arbitrary line AB by
clicking twice in the Graphics View.
Select the Line tool and create an arbitrary line AB by
clicking twice in the Graphics View.
2. ![]() Create a line BC using the Line tool again.
Create a line BC using the Line tool again.
Hint:
Select point B and then click in the Graphics View to create
point C.
3. ![]() Activate the Parallel Line tool and create a parallel line
to line AB through point C.
Activate the Parallel Line tool and create a parallel line
to line AB through point C.
Hint: Open the
Toolbox of Special Lines, activate the Parallel Line tool
and select the line AB and then point C.
4. ![]() Create a parallel line to line BC through point A using the
Parallel Line tool again.
Create a parallel line to line BC through point A using the
Parallel Line tool again.
5. ![]() Select the Intersect tool and create the intersection point
D of the two lines.
Select the Intersect tool and create the intersection point
D of the two lines.
Hint: Open the Toolbox of
Points, activate the Intersect tool and click directly on
the intersection point.
6. ![]() Activate the Polygon tool and create the parallelogram ABCD
by successively selecting all the vertices.
Activate the Polygon tool and create the parallelogram ABCD
by successively selecting all the vertices.
Note:
To close your polygon, select the first point again.
7. ![]() Select the Move tool and drag the vertices of the
parallelogram to check if it was constructed
correctly.
Select the Move tool and drag the vertices of the
parallelogram to check if it was constructed
correctly.
1. ![]() Create segment AB by clicking twice into the Graphics
View.
Create segment AB by clicking twice into the Graphics
View.
2. ![]() Construct a circle with center B through A by selecting
both points in this order.
Construct a circle with center B through A by selecting
both points in this order.
3. ![]() Drag points A and B to check if the circle is connected to
them.
Drag points A and B to check if the circle is connected to
them.
4. ![]() Construct a circle with center B through A by selecting
both points in this order.
Construct a circle with center B through A by selecting
both points in this order.
5. ![]() Intersect both circles by selecting them to get point
C.
Intersect both circles by selecting them to get point
C.
6. ![]() Create the polygon ABC in counterclockwise direction. To
close the polygon select the first point again.
Create the polygon ABC in counterclockwise direction. To
close the polygon select the first point again.
7. ![]() Hide the two circles by activating the Show/Hide Object
tool and selecting them. Confirm your selection by selecting
the Move tool.
Hide the two circles by activating the Show/Hide Object
tool and selecting them. Confirm your selection by selecting
the Move tool.
8. ![]() Show the interior angles of the triangle by clicking inside
the triangle.
Show the interior angles of the triangle by clicking inside
the triangle.
Hint: If you get the exterior angles of your
triangle, you probably created the polygon in clockwise
direction.
9. ![]() Apply the Drag Test to check if the construction is
correct.
Apply the Drag Test to check if the construction is
correct.
1. ![]() Create an arbitrary triangle ABC by clicking three times
into the Graphics View and then selecting the first created
point again.
Create an arbitrary triangle ABC by clicking three times
into the Graphics View and then selecting the first created
point again.
2. ![]() Construct the Perpendicular Bisector for each side of the
triangle.
Construct the Perpendicular Bisector for each side of the
triangle.
Hint: The Perpendicular Bisector tool
can be applied to an existing segment.
3. ![]() Create intersection point D of two of the line
bisectors.
Create intersection point D of two of the line
bisectors.
Hint: The Intersect tool can be
applied to the intersection of three lines or by
successively selecting two of the three line
bisectors.
4. ![]() Construct a circle with center D through one of the
vertices of triangle ABC by first selecting D and then one
of the vertices of the triangle.
Construct a circle with center D through one of the
vertices of triangle ABC by first selecting D and then one
of the vertices of the triangle.
5. ![]() Perform the Drag Test moving the vertices of the triangle
to check if your construction is correct.
Perform the Drag Test moving the vertices of the triangle
to check if your construction is correct.
1. ![]() Make sure that you have the picture of the yellow flower
saved on your computer before you start with the actual
construction.
Make sure that you have the picture of the yellow flower
saved on your computer before you start with the actual
construction.
2. ![]() Create a new point A.
Create a new point A.
3. ![]() Construct a line of reflection through two new points by
clicking twice into the Graphics View.
Construct a line of reflection through two new points by
clicking twice into the Graphics View.
4. ![]() Mirror point A at the line to get its image A’.
Mirror point A at the line to get its image A’.
Hint:
First select point A and then the line.
5. ![]() Create a segment between point A and its image A’ by
selecting both points.
Create a segment between point A and its image A’ by
selecting both points.
6. ![]() Turn the trace on for points A and A′.
Turn the trace on for points A and A′.
Hint:
Right-click (MacOS: Ctrl-click) on a point and select Show
Trace.
Note: Whenever point A is moved, it
leaves a trace in the Graphics View.
7. ![]() Drag point A to draw a trace.
Drag point A to draw a trace.
Hint: The menu
item Refresh Views in the View Menu clears all trace.
1. ![]() Make sure that you have the picture of the sunset saved on
your computer before you start the actual
construction.
Make sure that you have the picture of the sunset saved on
your computer before you start the actual
construction.
2. ![]() Insert the picture of the sunset in the left part of the
Graphics View using the Image tool.
Insert the picture of the sunset in the left part of the
Graphics View using the Image tool.
Note: The first corner point A and the second corner
point B of the image are created automatically.
3. ![]() Move point A at the lower left corner of the picture and
observe, how this affects the picture.
Move point A at the lower left corner of the picture and
observe, how this affects the picture.
4. ![]() Delete point B using the Delete tool.
Delete point B using the Delete tool.
5. ![]() Create a new point B by entering B = A + (3, 0) into the
Input Bar.
Create a new point B by entering B = A + (3, 0) into the
Input Bar.
Hint: Don't forget to press Enter
after your input.
6. ![]() Set the new point B as the SECOND corner point of the
picture to change its width to 3 cm.
Set the new point B as the SECOND corner point of the
picture to change its width to 3 cm.
Hint: Open the Settings of the image and select tab
Position.
7. ![]() Create a vertical line through two points in the middle of
the Graphics View using the Line tool.
Create a vertical line through two points in the middle of
the Graphics View using the Line tool.
8. ![]() Mirror the picture at the line using the Reflect about Line
tool by selecting the image and then the line.
Mirror the picture at the line using the Reflect about Line
tool by selecting the image and then the line.
9. ![]() You might want to reduce the opacity of the image to be
able to better distinguish it from the original (Settings of
the image, tab Color).
You might want to reduce the opacity of the image to be
able to better distinguish it from the original (Settings of
the image, tab Color).
1. ![]() Make sure that you have the picture of Bart Simpson saved
on your computer before you start the actual
construction.
Make sure that you have the picture of Bart Simpson saved
on your computer before you start the actual
construction.
2. ![]() Select the Image tool to insert the picture of Bart.
Select the Image tool to insert the picture of Bart.
Hint:
Geometry Calculator will automatically create the first and
second corner point A and B of the picture.
3. ![]() Drag the first corner point A of the picture to position
(1, 1).
Drag the first corner point A of the picture to position
(1, 1).
4. ![]() Create point D = (1, 3.9).
Create point D = (1, 3.9).
Hint: You can enter
the coordinates directly into the Input Bar.
5. ![]() Set point D as the FOURTH corner point of the picture.
Set point D as the FOURTH corner point of the picture.
Hint:
Open the Settings of the picture and select tab
Position.
6. ![]() Create a rigid triangle ABD using the Rigid Polygon
tool.
Create a rigid triangle ABD using the Rigid Polygon
tool.
Hint: Close the polygon by selecting the
first point again. The resulting polygon will keep its shape
when moved. It can be moved or rotated by dragging two
vertices.
1. ![]() Create an arbitrary triangle ABC in the first quadrant,
placing the vertices on grid points.
Create an arbitrary triangle ABC in the first quadrant,
placing the vertices on grid points.
2. ![]() Create a new point D at the origin of the coordinate
system.
Create a new point D at the origin of the coordinate
system.
3. ![]() Rename the point D to O.
Rename the point D to O.
Hint: Select point D
and just type O to open the Rename dialog.
4. ![]() Create a slider for angle α.
Create a slider for angle α.
Hint: In the
Slider dialog window, check Angle and set the Increment to
90°. Make sure you don’t delete the ° symbol.
5. ![]() Use the Rotate around Point tool to rotate triangle ABC
around point O by angle α.
Use the Rotate around Point tool to rotate triangle ABC
around point O by angle α.
Hints: Activate the
tool and select the triangle before you select the center of
rotation. In the appearing dialog, enter α as the angle
through the Virtual Keyboard and choose counter clockwise
rotation.
6. ![]() Create segments AO and A’O.
Create segments AO and A’O.
7. ![]() Create angle AOA’.
Create angle AOA’.
Hint: Select the points in
counter clockwise order.
8. ![]() Hide the label of angle AOA’.
Hide the label of angle AOA’.
9. ![]() Move the slider and explore the image of the
triangle.
Move the slider and explore the image of the
triangle.
1. ![]() Create sliders a, b, and c for the side lengths of the
triangle with an interval from 0 to 10 and increment 0.5
each.
Create sliders a, b, and c for the side lengths of the
triangle with an interval from 0 to 10 and increment 0.5
each.
2. ![]() Set the slider values to a = 8, b = 6.5, and c = 10.
Set the slider values to a = 8, b = 6.5, and c = 10.
3. ![]() Create segment f with given length c.
Create segment f with given length c.
Hint:
Points A and B are the endpoints of the segment.
4. ![]() Create a circle d with center A and radius b.
Create a circle d with center A and radius b.
5. ![]() Create a circle e with center B and radius a.
Create a circle e with center B and radius a.
6. ![]() Construct the intersection point C of the two circles e and
f.
Construct the intersection point C of the two circles e and
f.
7. ![]() Create the triangle ABC.
Create the triangle ABC.
8. ![]() Create interior angles α, β, and γ of triangle ABC.
Create interior angles α, β, and γ of triangle ABC.
9. ![]() Create a point D on circle d.
Create a point D on circle d.
10. ![]() Create segment g between the points A and D.
Create segment g between the points A and D.
11. ![]() Construct the midpoint E of segment g.
Construct the midpoint E of segment g.
12. ![]() Enter text1: b and attach it to point E.
Enter text1: b and attach it to point E.
Hint:
After selecting the Text tool, click on point E. Open
Advanced and select b from the Objects tab.
13. ![]() Create a point F on circle e.
Create a point F on circle e.
14. ![]() Create segment h between the points B and F.
Create segment h between the points B and F.
15. ![]() Construct the midpoint G of segment h.
Construct the midpoint G of segment h.
16. ![]() Enter text2: a and attach it to point G.
Enter text2: a and attach it to point G.
17. ![]() Hide points D, E, F and G by using the Show / Hide Object
tool.
Hide points D, E, F and G by using the Show / Hide Object
tool.
18. ![]() Enhance your construction by using the Style Bar and match
colors of corresponding objects.
Enhance your construction by using the Style Bar and match
colors of corresponding objects.
1. ![]() Create a triangle ABC with counter clockwise
orientation.
Create a triangle ABC with counter clockwise
orientation.
2. ![]() Create the angles α, β and γ of triangle ABC.
Create the angles α, β and γ of triangle ABC.
3. ![]() Create a slider for angle δ with interval 0° to 180° and
increment 10°.
Create a slider for angle δ with interval 0° to 180° and
increment 10°.
4. ![]() Create a slider for angle ε with interval 0° to 180° and
increment 10°.
Create a slider for angle ε with interval 0° to 180° and
increment 10°.
5. ![]() Create midpoint D of segment AC and midpoint E of segment
AB.
Create midpoint D of segment AC and midpoint E of segment
AB.
6. ![]() Rotate the triangle around point D by angle δ (setting
clockwise).
Rotate the triangle around point D by angle δ (setting
clockwise).
Hint: Enter δ by using the Virtual
Keyboard.
7. ![]() Rotate the triangle around point E by angle ε (setting
counter clockwise).
Rotate the triangle around point E by angle ε (setting
counter clockwise).
Hint: Enter ε by using the
Virtual Keyboard.
8. ![]() Move both sliders δ and ε to show 180°.
Move both sliders δ and ε to show 180°.
9. ![]() Create angle ζ using the points A’C’B’.
Create angle ζ using the points A’C’B’.
Hint:
To be sure to select the right vertices, change angle δ or
use the command
angle(A’, C’, B’) instead.
10. ![]() Create angle η using the points C'1B'1A'1.
Create angle η using the points C'1B'1A'1.
Hint:
To be sure to select the right vertices, change angle ε
before or use the command
angle(C'1, B'1, A'1) instead.
11. ![]() Enhance your construction using the Style Bar.
Enhance your construction using the Style Bar.
Hint:
Congruent angles should have the same color.
12. ![]() Create dynamic text displaying the interior angles and
their values (e.g. enter α = and select α from the list of
objects on the Advanced tab).
Create dynamic text displaying the interior angles and
their values (e.g. enter α = and select α from the list of
objects on the Advanced tab).
13. ![]() Calculate the angle sum by entering
Calculate the angle sum by entering
sum = α + β + γ in the Input Bar.
14. ![]() Insert the angle sum as a dynamic text:
Insert the angle sum as a dynamic text:
α + β + γ = and select sum from the list of
objects on the tab.
15. ![]() Match colors of corresponding angles and text using the
Style Bar.
Match colors of corresponding angles and text using the
Style Bar.
16. ![]() Fix all texts that are not supposed to be moved by using
the Style Bar.
Fix all texts that are not supposed to be moved by using
the Style Bar.

Helps students quickly verify formulas and solve problems during geometry courses, improving learning efficiency.
Architects calculate area and volume to assess design feasibility and optimize spatial layout.
Hobbyists use the geometry calculator to accurately measure materials when creating geometric craft projects.
Explore the connection between algebra and geometry, deepen understanding of math concepts, and use the geometry calculator to complete assignments and projects.

Teachers use the calculator for geometry to visually present geometric concepts during lesson planning and classroom demonstrations, improving teaching effectiveness.

Engineers rely on the geometry calculator to accurately calculate angles and lengths in structural or mechanical designs, reducing errors caused by manual calculations.

Hobbyists use the calculator to ensure precise measurements when creating geometry-based crafts.

Use the geometry calculator to quickly sketch and adjust early design concepts, gaining a clear understanding of spatial relationships before moving to detailed CAD tools.

Researchers visualize complex structures and analyze data using the calculator’s drawing and computation features, supporting scientific exploration.

Uses advanced algorithms to ensure high-precision geometric results.
Simple, intuitive interface with a clear workflow—no complex training needed, even for new users.
Integrates multiple tools and features to meet various geometry calculation needs in one place.
Fast performance and smooth operation, even with large data input or complex formulas.
Precisely draw shapes with control over size and properties, providing a reliable visual foundation for analysis and research.
All features of online geometry calculator are available at no cost, making high-quality geometric tools accessible to everyone.
Yes, it’s completely free. Users can access all features without any cost.
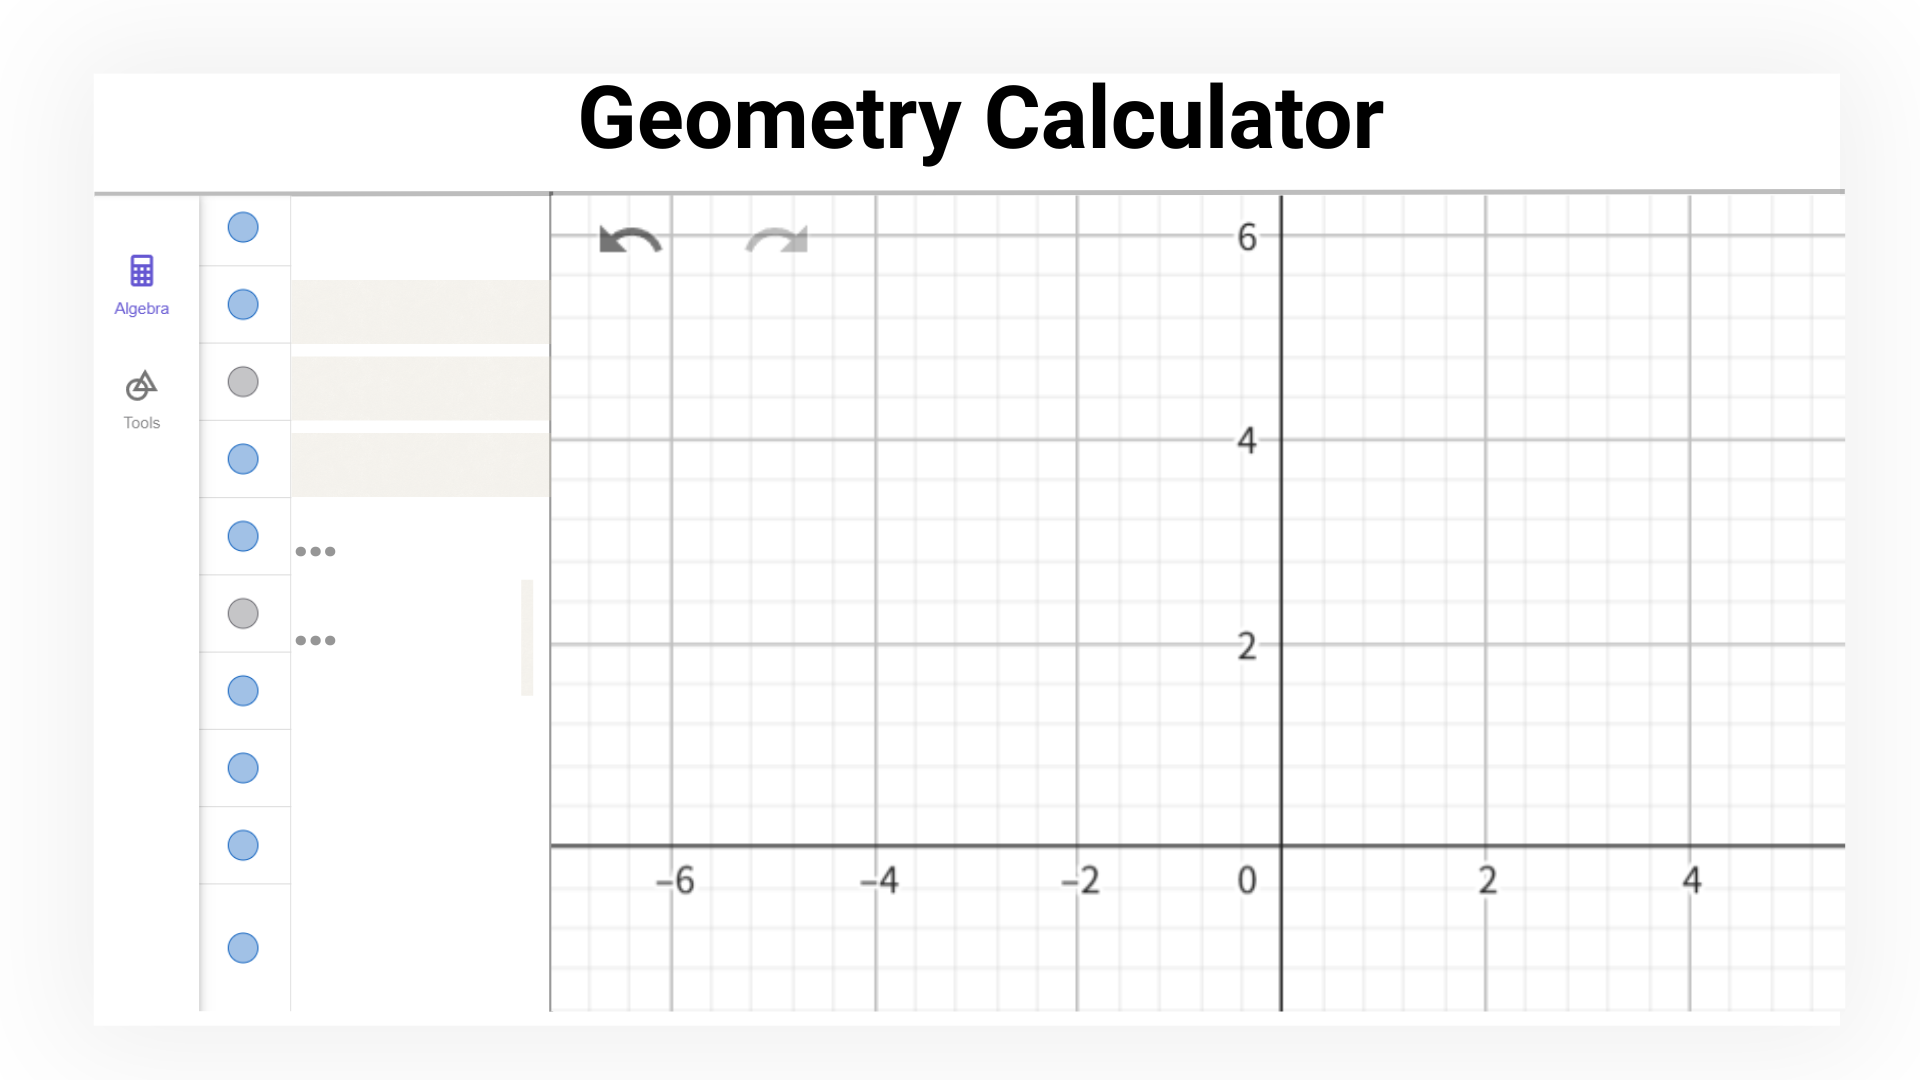
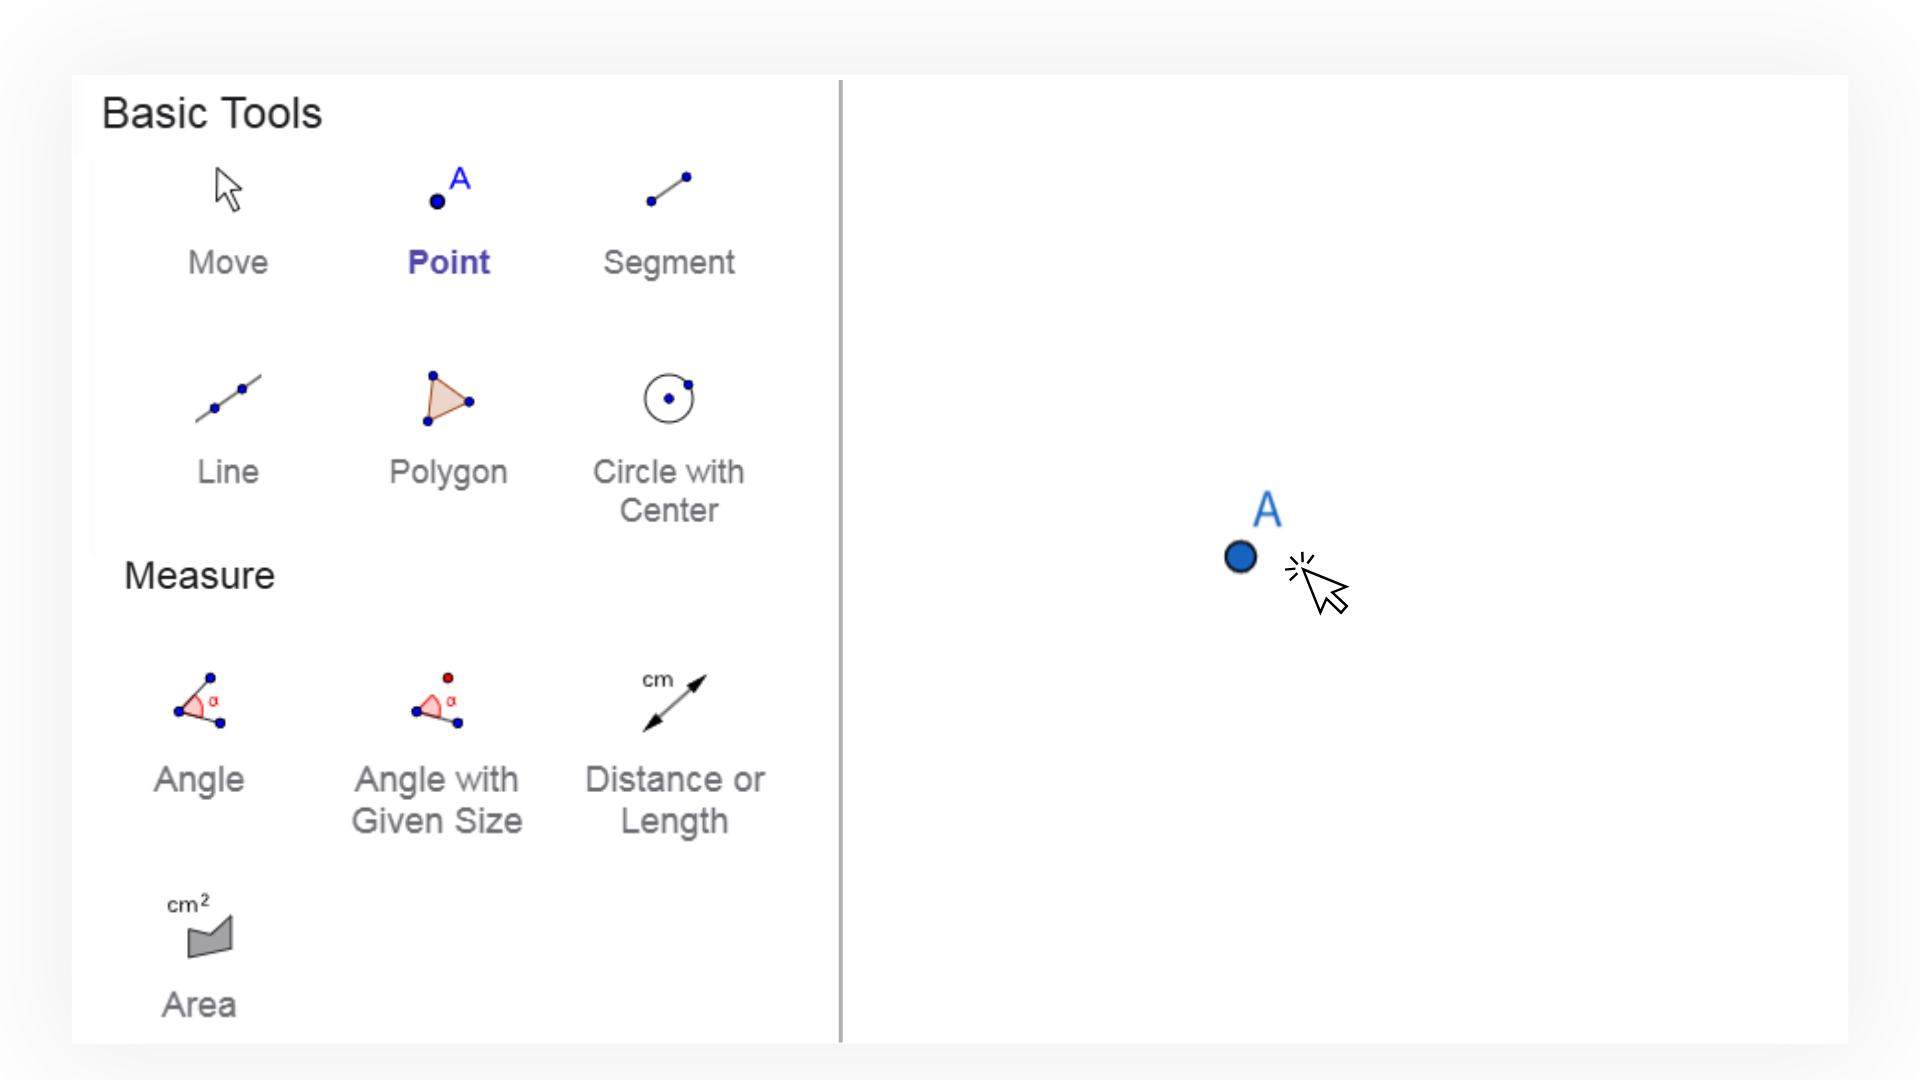
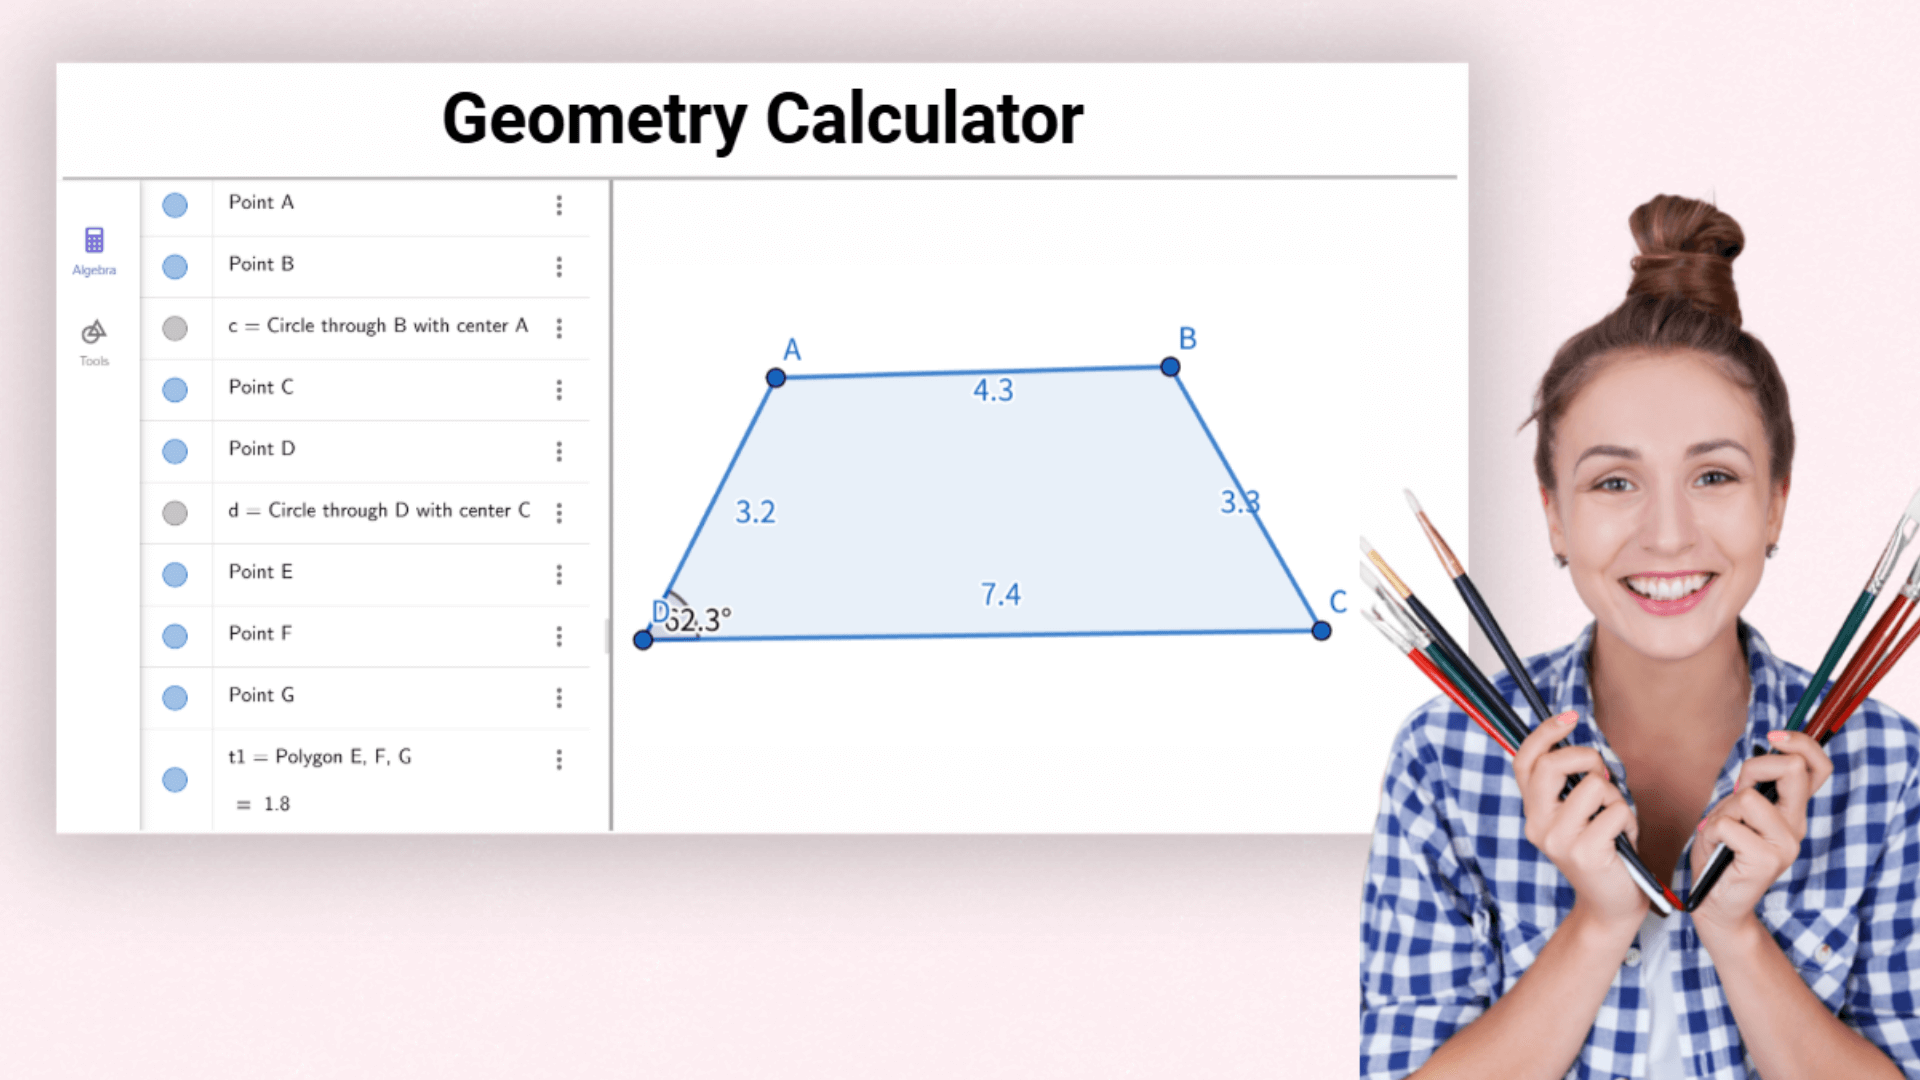
Open our website, select “New Geometry,” then click tools like “Point,” “Segment,” or “Circle” to place shapes in the drawing area.
It’s widely used in math education and can also assist in teaching geometry, algebra, and calculus.
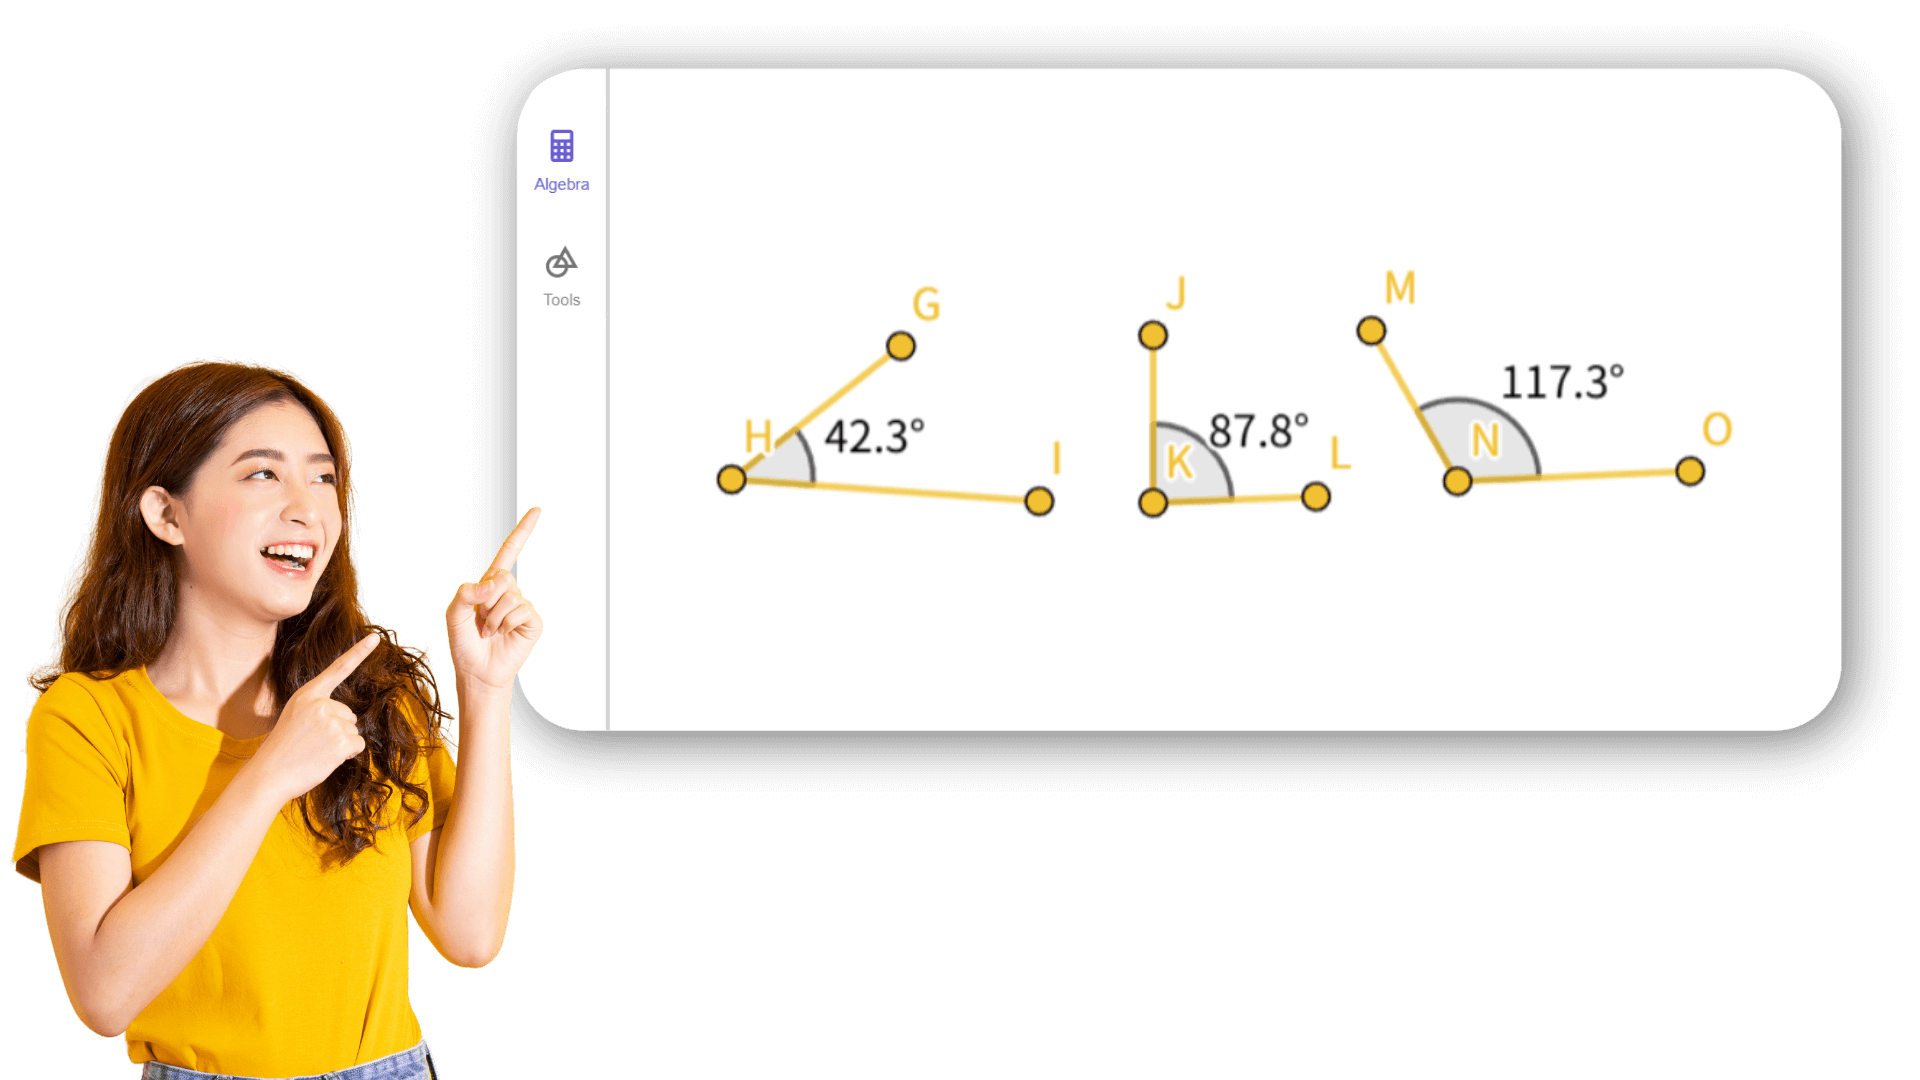
Draw or import the shape, select the object you want to measure, then choose properties like distance, length, angle, perimeter, or area. The results will appear in the drawing or algebra area.
Yes. The geometry calculator is easy to use with an intuitive interface—perfect for beginners to get started quickly.
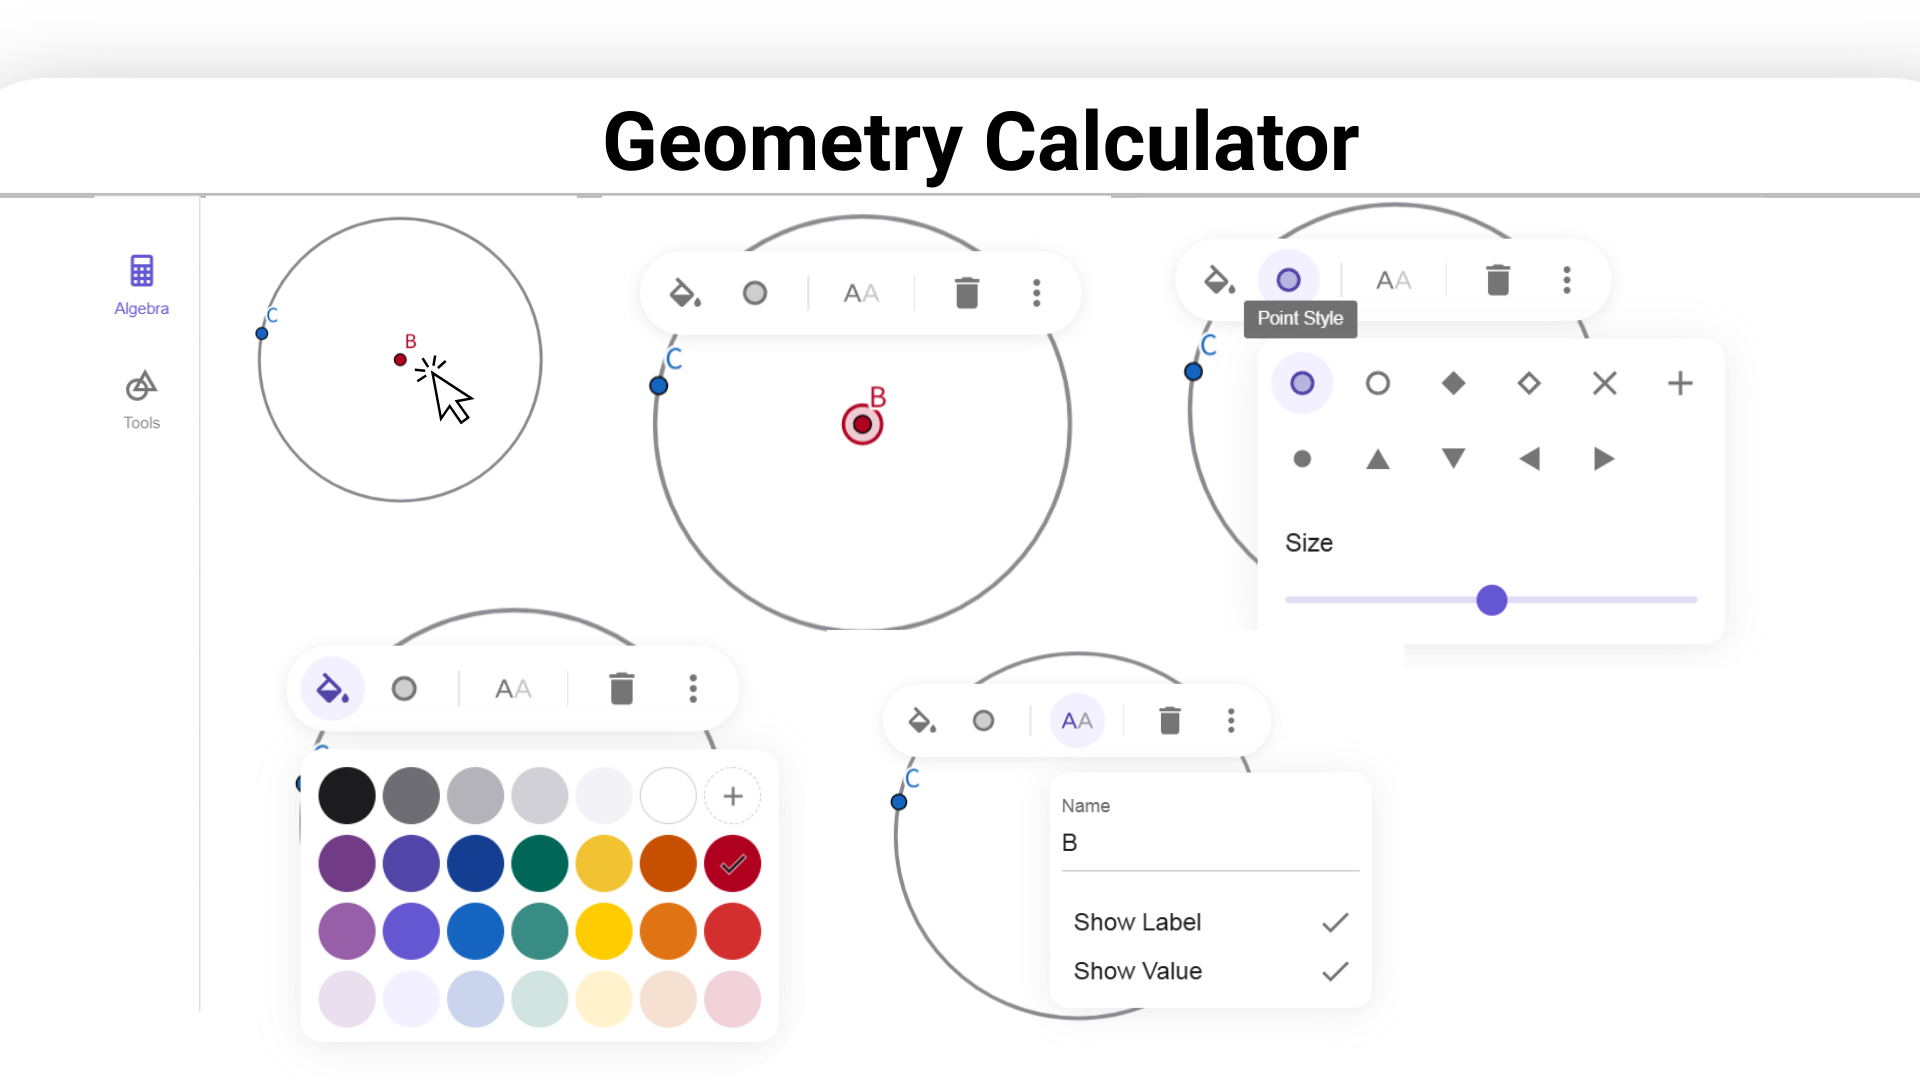
Select the shape and use the right-click menu or the properties panel to edit its appearance, including color, line style, and fill.
Our geometry calculator uses advanced algorithms to deliver precise and reliable results.
It helps students explore the link between algebra and geometry, and supports them in completing assignments and research projects more efficiently.